
Cutting and buffing single stage paint is a process that can help restore the shine and luster of a car’s paint job. Single stage paint is a type of paint that combines the color and clear coat into one layer, unlike two-stage paint which has a separate layer of clear coat. While single stage paint is less expensive and easier to apply, it is also more prone to oxidation and fading over time.
To cut and buff single stage paint, it is important to first understand the type of paint and its characteristics. Proper preparation is also crucial to ensure a successful outcome. This includes cleaning the surface of the car, removing any contaminants, and sanding the paint to create a smooth surface. The actual cutting and buffing process involves using abrasive compounds to remove any imperfections and restore the shine of the paint.
Key Takeaways
- Understanding the type of paint and its characteristics is crucial before beginning the process of cutting and buffing single stage paint.
- Proper preparation, including cleaning and sanding the surface, is necessary to achieve a successful outcome.
- The actual cutting and buffing process involves using abrasive compounds to remove imperfections and restore the shine of the paint.
Understanding Single Stage Paint
As a car enthusiast, I have always been fascinated by the different types of paint systems used in the automotive industry. One of the most commonly used paint systems is the single stage paint system. In this section, I will explain the characteristics of single stage paint and the differences between single stage and base/clear systems.
Characteristics of Single Stage Paint
Single stage paint is a type of paint system that combines the color and clear coat into one layer. This means that the paint is applied in one step, and there is no need for a separate clear coat layer. Single stage paint is available in different formulations, including single stage urethane and acrylic enamel.
One of the benefits of single stage paint is that it is easier to apply than base/clear systems. This is because there is no need to apply a separate clear coat, which saves time and reduces the risk of errors. Single stage paint is also more affordable than base/clear systems, making it a popular choice for car enthusiasts who are on a budget.
Single stage paint is available in a range of colors, including metallic and pearl finishes. Metallic finishes contain small metal flakes that give the paint a shimmering effect, while pearl finishes contain small particles that create a pearl-like appearance.
Differences Between Single Stage and Base/Clear Systems
The main difference between single stage and base/clear systems is the number of layers required. Base/clear systems require two or three layers: a base coat, a midcoat (if applicable), and a clear coat. The base coat provides the color, the midcoat (if applicable) provides additional effects such as metallic or pearl, and the clear coat provides protection and gloss.
In contrast, single stage systems combine the color and clear coat into one layer. This means that there is no need for a separate clear coat layer. While this makes single stage systems easier to apply, it also means that they are less durable than base/clear systems. Single stage systems are more prone to fading and oxidation over time, which can lead to a loss of gloss and color.
In conclusion, single stage paint is a popular choice for car enthusiasts who are looking for an affordable and easy-to-apply paint system. While it is less durable than base/clear systems, it is available in a range of colors and finishes, including metallic and pearl. Understanding the characteristics of single stage paint and the differences between single stage and base/clear systems can help car enthusiasts make an informed decision when choosing a paint system for their vehicle.
Preparation for Cut and Buff
Required Materials and Tools
Before starting the cut and buff process, I need to make sure I have all the necessary materials and tools. Here is a list of items I will need:
- Sanding block
- Sandpaper (grit ranging from 600 to 2000)
- Water
- Clean microfiber towels
- Single stage paint
- Cutting compound
- Polishing compound
- Foam pads (coarse and fine)
- Dual action polisher
Surface Cleaning and Assessment
The surface of the single stage paint needs to be clean and free of any contaminants before starting the cut and buff process. I will start by washing the car with soap and water, and then drying it with a clean microfiber towel.
Next, I will assess the surface for any imperfections such as scratches, swirl marks, or orange peel. If there are any imperfections, I will need to sand them down with a sanding block and sandpaper. I will start with a coarse grit sandpaper and work my way up to a finer grit until the surface is smooth.
After sanding, I will need to clean the surface again to remove any dust or debris. Once the surface is clean and smooth, I can begin the cut and buff process.
In conclusion, proper preparation is key to achieving a flawless cut and buff on single stage paint. By having the required materials and tools, and ensuring the surface is clean and free of any imperfections, I can confidently proceed with the cut and buff process.
Sanding Techniques
When it comes to cutting and buffing single-stage paint, proper sanding techniques are crucial. Here are some tips to help you achieve a smooth and even finish.
Wet Sanding Process
Wet sanding is the process of using a wet sandpaper to remove imperfections on the surface of the paint. It is called “wet” sanding because the sandpaper is constantly wet while being used. Wet sanding helps to reduce the amount of dust created during the sanding process and also helps to prevent the sandpaper from clogging.
To wet sand, you will need a sanding block, sandpaper, and a bucket of water. Start by soaking the sandpaper in the water for a few minutes. Then, wrap the sandpaper around the sanding block and dip it into the water. Begin sanding the surface of the paint in a circular motion, applying light pressure. Keep the sandpaper wet at all times and frequently rinse it in the water to remove any debris.
Using the Correct Grit
Using the correct grit of sandpaper is important to achieve a smooth and even finish. The grit refers to the coarseness of the sandpaper, with lower numbers being more coarse and higher numbers being finer.
When sanding single-stage paint, start with a coarse grit sandpaper, such as 600 grit, to remove any orange peel or other imperfections. Then, move on to a finer grit sandpaper, such as 1500 grit, to smooth out the surface and prepare it for buffing.
It is important to note that using too fine of a grit sandpaper can actually make the surface of the paint more difficult to buff. This is because the finer grit sandpaper can create a smoother surface that is more resistant to buffing.
In conclusion, using proper sanding techniques is essential to achieving a smooth and even finish when cutting and buffing single-stage paint. Wet sanding and using the correct grit of sandpaper can help to remove imperfections and prepare the surface for buffing.
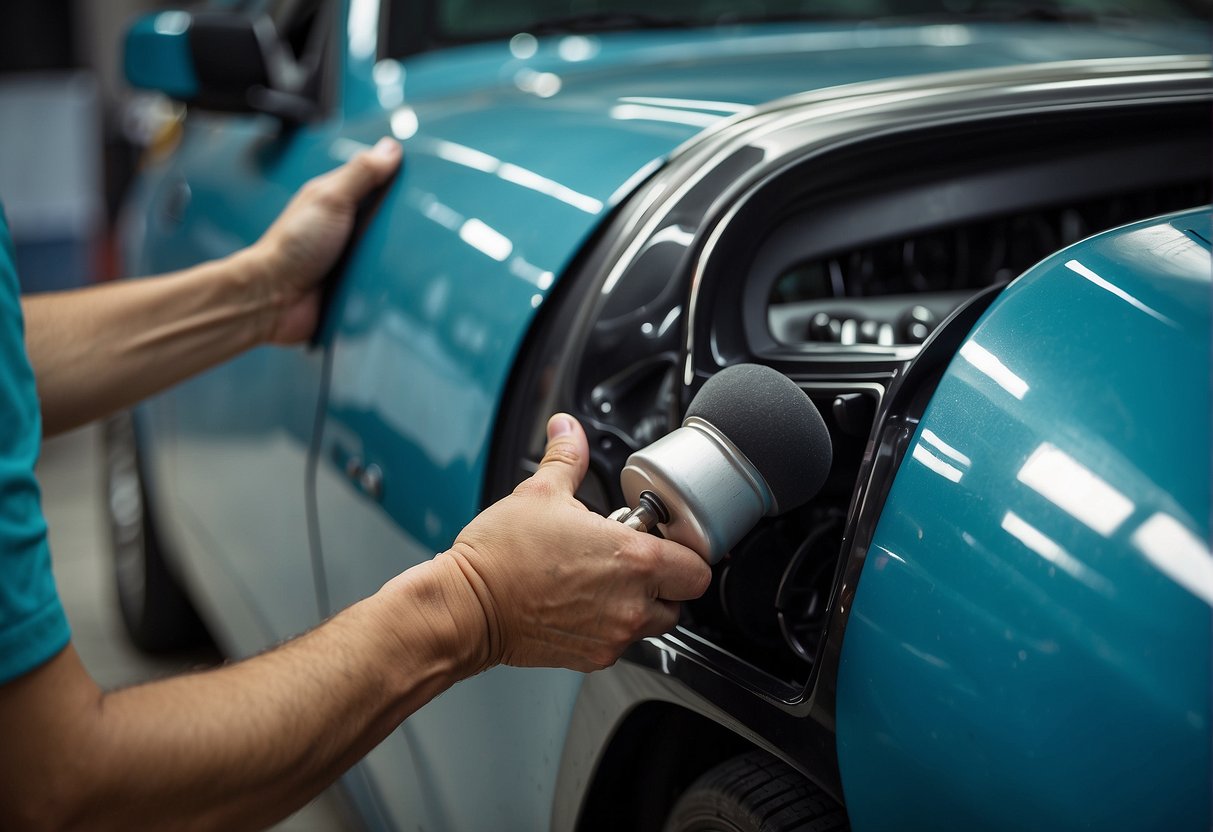
Buffing and Polishing Procedures
When it comes to buffing and polishing single stage paint, it’s important to follow the right procedures to achieve a high-quality finish. In this section, I’ll discuss the initial cutting phase and polishing to enhance gloss.
Initial Cutting Phase
The initial cutting phase is the first step in buffing and polishing single stage paint. This step involves using a rubbing compound or machine glaze to remove any imperfections and scratches on the surface of the paint. A foam pad is usually used for this step.
When using a rubbing compound, it’s important to apply it evenly across the surface of the paint. I usually work in small sections to ensure that I don’t miss any spots. I also make sure to use a light pressure when applying the rubbing compound to avoid damaging the paint.
Polishing to Enhance Gloss
After the initial cutting phase, the next step is to polish the paint to enhance its glossiness. A glazing compound or hand glaze is usually used for this step. I prefer to use a foam pad for this step as well.
When using a glazing compound, it’s important to apply it evenly across the surface of the paint. I usually work in small sections to ensure that I don’t miss any spots. I also make sure to use a light pressure when applying the glazing compound to avoid damaging the paint.
Polishing the paint to enhance its glossiness is an important step in achieving a high-quality finish. A good polish can help to improve the DOI (Distinctness of Image) and shine of the paint. I usually use a high-quality polish like Ultra-Cut to achieve the best results.
In conclusion, buffing and polishing single stage paint requires the right tools, techniques, and procedures. By following the steps outlined in this section, you can achieve a high-quality finish that will make your car look its best.
Final Touches and Protection
After completing the cut and buff process, it’s important to take the necessary steps to protect your newly restored single stage paint. This includes applying wax and following proper maintenance tips.
Applying Wax for Protection
Waxing your single stage paint will not only add a layer of protection but also enhance the shine and color match. When selecting a wax, it’s important to choose one that is specifically formulated for single stage paint. This will ensure that the wax is compatible with the paint and won’t cause any damage or swirling.
To apply wax, start by thoroughly washing and drying your vehicle. Then, using a foam applicator pad, apply a small amount of wax to the pad and work it into the paint in a circular motion. Be sure to avoid applying wax to any non-painted surfaces such as rubber or plastic trim. Once the wax has been applied, use a microfiber towel to buff off any excess wax and reveal a high gloss shine.
Maintenance Tips
Proper maintenance is key to keeping your single stage paint looking its best. Here are a few tips to help you maintain your newly restored paint job:
- Avoid parking in direct sunlight for extended periods of time as this can cause the paint to fade.
- Wash your vehicle regularly using a pH-neutral car wash soap and a microfiber wash mitt to avoid scratching the paint.
- Dry your vehicle using a microfiber towel to prevent water spots.
- Use a detail spray or quick detailer to maintain the shine in between washes.
- Avoid using abrasive or harsh cleaners on your paint as this can cause damage and swirling.
By following these maintenance tips and regularly waxing your single stage paint, you can ensure that your paint job will look great for years to come.
Frequently Asked Questions
What is the proper waiting period before buffing single stage paint?
The waiting period before buffing single stage paint varies depending on the type of paint used and the environmental conditions. Generally, it is recommended to wait at least 24 to 48 hours after the final coat of paint has been applied before buffing. This allows the paint to fully cure and harden, ensuring that it does not get damaged during the buffing process.
How do you remove orange peel from single stage paint?
Orange peel is a common issue that can occur when applying single stage paint. To remove orange peel, you will need to use a sandpaper with a fine grit. Wet sand the affected area until the orange peel has been removed, then use a rubbing compound to buff the area to a smooth finish.
Is it possible to wet sand and polish single stage urethane paint effectively?
Yes, it is possible to wet sand and polish single stage urethane paint effectively. Wet sanding with a fine grit sandpaper can help to remove imperfections, and polishing with a high-quality compound can help to achieve a smooth, glossy finish. However, it is important to be careful when wet sanding, as too much pressure can damage the paint.
What techniques are recommended for buffing single stage metallic paint?
When buffing single stage metallic paint, it is important to use a high-quality compound that is specifically designed for use on metallic finishes. It is also recommended to use a foam pad, as this can help to prevent swirl marks and other imperfections. It is important to work in small sections, using a light to moderate amount of pressure, and to keep the pad clean throughout the buffing process.
Which polish should be used to achieve the best results on single stage paint?
There are many different polishes available that can be used to achieve great results on single stage paint. It is important to choose a high-quality polish that is specifically designed for use on automotive finishes. Some popular options include Meguiar’s Ultimate Compound, 3M Perfect-It Rubbing Compound, and Menzerna FG400.
How long does it typically take for single stage paint to fully cure?
The curing time for single stage paint can vary depending on the type of paint used and the environmental conditions. Generally, it is recommended to wait at least 7 to 10 days before exposing the paint to any harsh chemicals or abrasive materials. This allows the paint to fully cure and harden, ensuring that it is durable and long-lasting.

Hi, I’m Sal Muller of Tooltrip.com. My DIY experience led me to understand essential power tools for home projects. Tooltrip.com guides enthusiasts and professionals in choosing right tools for any job. I provide concise top tool reviews for easier, efficient DIY.
